Showing posts with label Scenery. Show all posts

Friday, 22 April 2016

SCATTER!

What's occurrin'?

I've been immersing myself in the fascinating area of our hobby known as scatter terrain. What diversity! Loads of inspirational sites visited but as usual frugality won the day. I found some excellent tutorials on an old scenery forum called Terragenesis. I don't know if any of you are aware of it,  go check it out, a fantastic resource of D.I.Y. scenery. As well as the D.I.Y. stuff I've made another attempt at card modelling using some free to download printouts. Although printer ink is more expensive than champagne, nine times more, hardly frugal. Saying that you can still get a decent amount out of one cartridge.

Before we move on to the meat of the post, let's not forget our usual enrichment. The cultural quest continues this time with another fine example of Savage zombie's work. It's called Zombie Doodle. Wow, if only I could doodle this well! The flies are a lovely touch. Enjoy!

ZOMBIE DOODLE!

So, first of all my tiny collection of vehicles got a "crap" wash. Gives them a real world grime coat and makes them look less like toys.

PRISON SEEMS TO BE LETTING OUT EARLY?

A very important first step in this process is to give them a coat of matt varnish. I used a cheap acrylic brush on varnish from a local discount store. It stops the wash just sliding off. Don't worry about being too tidy at this first stage as any brush marks etc. just add to the effect at the next stage. I didn't even bother to mask the windows, although that might improve the look of a vehicle your band of survivors are going to use regularly.

IS THIS AN ILLEGAL CHOP SHOP?

I then mixed my "crap" wash. Taking an empty paint pot, I put in a little black paint, then added some dark brown emulsion from a tester pot. These were only small amounts of paint, a brushful of black and two of brown. The pot was then filled with water and shaken vigourously for a minute.

SPORTSCAR IN THE APOCALYPSE? REALLY?

Put plenty of newspaper down and slap the "crap" all over the vehicles. Leave to dry. Further coats can be added until you are happy with the desired effect. Although these only got one coat. Because of the matt varnish the "crap" wash covers stickers equally as well as the bodywork!

THAT'S A FUCKING BIG SUV!

Moving on from the vehicles, let's get to the scatter terrain proper. These dumpsters were free to download (of course) from the Combat Storm website. Assembled as instructions. To make them sturdy enough to contend with the rigours of gaming and storage they were stuck to "credit" card plastic bases. Which were then sanded, painted and flocked.

FEATURING COMPULSORY DUMPSTER PORN. LOW RES MIND.

Various details were added. The pallets were made from coffee stirrers and matchsticks, following an excellent tutorial article on Terragenesis (the old site) by Snitchy the Dog. I sculpted the rubbish (trash) bags from greenstuff, they look a lot better now they are painted.

A BLUE DUMPSTER.

The other bits and pieces are from the bottomless "bits" box, mostly 40K stuff. I also used some of the boxes from the stack I had previously downloaded by the amazing papercrafter Tommygun. Posters used were kindly provided by The Tollman.

A PALE DUMPSTER.

This final one was made by cutting the shapes of a dumpster from plain black card, using the downloads as a template. Apart from that, the same process was used to build it. A lot more wear and tear was painted on this one, it was really plain.

A NAUGHTY DUMPSTER.

A few side on shots of the dumpsters to better show the added details!

A ROW OF DETAILED DUMPSTERS.

It's worth mentioning the silver fuel barrel below. Made from paper and wire, again following a superb tutorial found on Terragenesis. This one is by bug_bait. I've made a bit of a production line of them now. Same with the pallets.

MORE DETAIL PORN.

A small barricade, useful for blocking alleys and such. Toy car, old Tamiya fuel drum, cut glue sticks, kitchen roll and some simulated barbed wire.

MAN THE BARRICADES!

More free to download card terrain. Vending machines from Tommygun. I think this is known as "street furniture" by the cool kids.

GRAB AN ICE COLD COKE AND SHUT THE FUCK UP!

Finally, more boxes. Boxes are a bit like zombies, you can never have too many of them. These little ones are really fiddly. A new method using old photo's has vastly improved the performance of these free to download printouts. All by Tommygun again.

BOXES, BOXES EVERYWHERE! FOUSANDS OF 'EM.

I guess that's all I got for this time dudes and dudettes. So until next time, follow in the DUDE'S wake and "take her easy".


Sunday, 27 March 2016

HAPPY ZOMBIE JESUS DAY!

What's occurrin'?

Still not back to posting weekly yet. Twice in one month is an improvement though. I have been working away on more scenery for ATZ, so I thought I'd post my progress so far, better than nothing eh! The bunker is pretty quiet this weekend, people away on a mission in enemy territory(a Vamps concert in Birmingham). So the plan is to get an ATZ marathon in, further familiarising myself with the rules and note taking process before I go "live". Let's hope the plan survives contact with the enemy.

Before we charge off to see what I've been doing, let's not forget the cultural mission. Let the enrichment begin. Another fantastic piece by Savagezombie. I love the underlit effect on this one, superb stuff. It's called Zombie Goodness. Enjoy!

ZOMBIE GOODNESS.

First of all, the roads I made got some love. Just used masking tape to delineate the markings. Then painted them with some white paint. Simples!

ROADMARKINGS.

Some of you may remember the mesh fences I made some time ago. Well they are all based and weathered now. Basing was just drybrushed and flocked. I used some old ink to simulate rust.

MESH FENCES FINISHED AT LAST.

The next photo was trying to show the difference in height between the two sets of wire mesh fences. It didn't turn out so good though. The shorter one at the front is rather obscured by the taller one at the back. D'oh!

TWO DIFFERENT SIZED FENCES.

Can't remember if I've shown these ones before. Made with "craft" sticks, which are basically lolly (popsicle) sticks cut diagonally leaving a pointed end. They give a little more worn and rugged effect to a fence, leaving some nice looking gaps too. Mounted on really thick card rather than the foamcore the mesh fences were based with.

RUSTIC WOODEN FENCES.

The next lot are just corrugated card, some skewers for uprights again based on foamcore. Same deal as before, drybrushing and flock for the base, ink for the rust stains.

CORRUGATED STEEL FENCES.

These smaller fences are the same card with matchsticks for uprights and based on lolly sticks. Filler and sand to make up the ground, then painted and flocked.

SMALLER CORRUGATED FENCES.

The little wooden fences are made from coffee stirrers hot glued onto lolly sticks. Based as the small fences above.

BLUE WOODEN FENCES.

Now I know you've seen these before, well the one on the left anyway. I'd originally made a dozen of them. Well...... my little puppy liked them so much she ate four of them. So I made another set, the one on the right. To make them different to the others I inverted them. Apart from that everything else was the same as before.

REPLACEMENT RANCH FENCES. ON THE RIGHT.

Well that's all I got for this time dudes and dudettes. So until next time remember to try and emulate the DUDE and "take her easy".


Monday, 7 March 2016

I'VE BEEN BUSY!

What's occurrin'!

My posting this year has been a little slack to say the least. Hopefully that's going to change from now on. I'm feeling much better now and I'm finally starting to get my shit together at last. I haven't been idle these last couple of weeks either but more on that in a bit. Even played my first game of ATZ! Will wonders never cease?

Before we move on, let's not forget my cultural mission. You know by now I'm trying to bring a little culture to the world of zombies. This mainly involves trying to find different zombie artists and showing some of their work on my humble little blog. Hopefully enriching us all in the process. So this time I want to show you all another wonderful piece by Savagezombie (a.k.a. Chris Bolton). This one is called Fear the Dead. Enjoy!

FEAR THE DEAD!
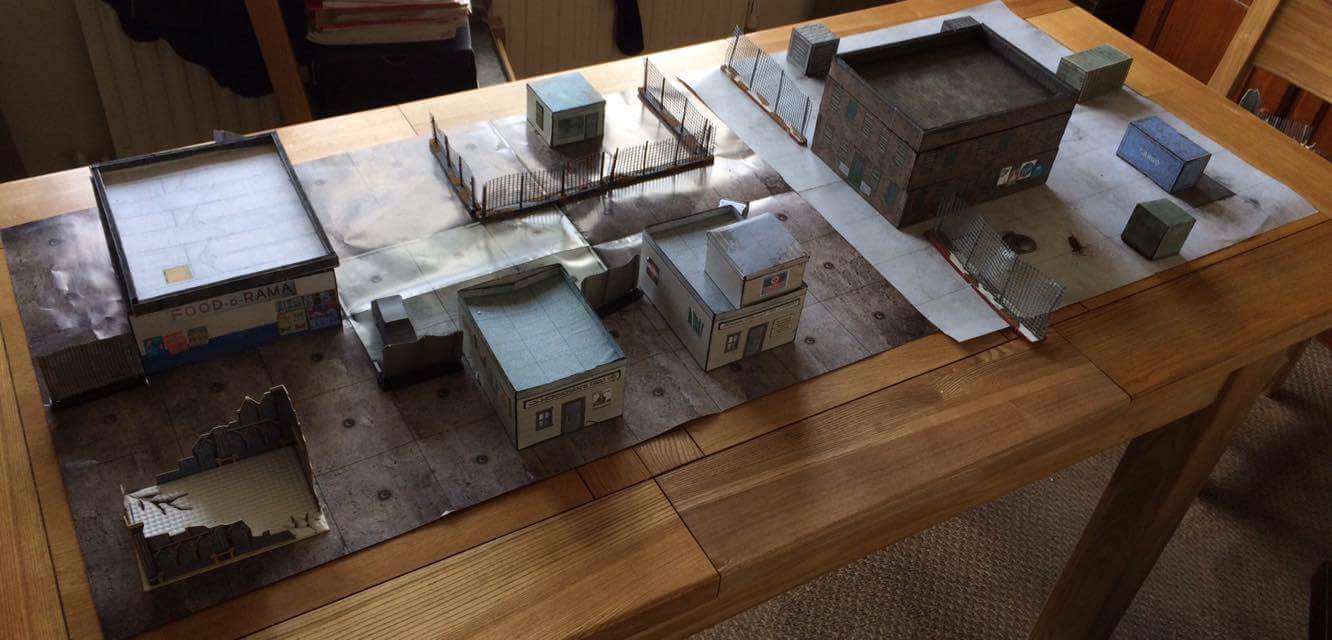
OK, so after my last post, I decided to re-think the board. After reading your comments and re-reading the rule book I cut some 12 inch squares from stuff I'd been hoarding, namely draw bottoms and the back of bookcases from cheap MDF furniture. It isn't even wood, more like compressed card. Perfect for my use.

I then covered the squares using the two game mats I mentioned last post. This is when I hit my first snag. Even with patching I only had enough for seven boards. Arse! Not enough for the nine boards, making up the three foot square smallest playing area. What to do? Sheldon again came to my rescue. When he kindly donated the urban game mats, he'd also thrown in a railway grass mat that he really didn't like. So I covered three boards with it. Problem solved.

OVERVIEW OF THE NEW BOARD.

I also made up several road sections from card, this was then covered in true Blue Peter style. Yes, sticky backed plastic! I'd picked up some with a chalk board finish, very cheaply, from a local discount store. Just for this purpose. As you can see from the above picture, I still need to paint on some road markings. But it is heading in the right direction.

You've seen all the buildings before, so nothing new on that front. Finally able to lay out a "proper" playing area, I took the opportunity to play my first game. I don't think I made too many mistakes and everything ran pretty smoothly. A few more run throughs and I think I'll be ready to spring it on the WNI. Although playing solo was great fun too. I might need a little longer to be able to post batreps but I'm getting there.

OUR INTREPID BAND OF HEROES LEAVE THE STORE EMPTY HANDED.

The wooded areas, some old 40K scenery I made almost ten years ago, were dragged out of my storage cupboard. The lesson here being never throw anything out.

I then threw a few toy cars on for the photo's, I still haven't glued together my card vehicles yet. To be honest I haven't even dirtied up the toy ones, like I was going to do. Yet another job on the to do list.

A VIEW UP THE STREET.

So pretty pleased with the progress so far, even though there are lots of things to finish.

MY FIRST GANG!  REDNECKS HOLDING OUT IN THE OLD WAREHOUSE.

My first gang made an appearance in my first game. I went with rednecks as opposed to a more urban crew, the figures I had kind of lead me in that direction. I quite like the idea of the local good ole boys tooling up and teaming up to survive.

ZOMBIES LURCHING OUT OF THE WOODS.

You'll recognise the fences too, coffee stirrers and lolly (popsicle) sticks. They are actually finished, just about the only thing that is.

MORE ZOMBIES HEADING TOWARDS ALL THE GUNFIRE.
ZOMBIES AT THE FENCE LINE.

I've also been working on some scatter terrain. The cargo containers are free of course and came from the Combat Storm website. Are cargo containers even scatter terrain?

The "interesting" weathered look of them was the result of a happy accident. I used spray mount to stick the printouts to card. I don't think I shook the can long enough and as a result the solvent stained the printout. Saves me weathering them I suppose.

MORE CARGO CONTAINERS. SCATTER TERRAIN?

I broke out the sculpting putty for the first time in many years, and had a go at creating some rubbish bags. Amazingly, they look almost passable. Well they are rubbish! Should look even better when painted.

POORLY SCULPTED RUBBISH (TRASH) BAGS.

Well, I guess that's all I got for this time dudes and dudettes. So until next time, try and be more like the DUDE and "take her easy".


Monday, 15 February 2016

SCRATCHING AN ITCH!

What's ocurrin'.

This lack of motivation seems to be lasting longer than usual! Still no painting done. I thought I'd post a few pics to get peoples opinion on something. This blog is into it's second year and initially was to track the progress of my ATZ gaming journey. The progress has been severely sidetracked by my very slow painting of my Zombicide figures. All three seasons! I justify this by the fact that I will be using them for ATZ, to myself at least, until now.

OK, let's not forget the cultural mission. This time I have another masterpiece from Savagezombie aka Chris Bolton to show you. And it's a cracker! This one is called Singlet Zombie, classy or what? Enjoy!

SINGLET ZOMBIE.

Well, I still want to play ATZ and I'm itching to get a few practice games in. To try and scratch the itch a little, I  tried to set up a playing area. So I guess what I'm after is the answer to the question, is it enough?

I know that a lot of it is unfinished, that will be dealt with eventually. I just really want to walk through a few games to get the hang of the rules, before I spring it on the Wednesday Night Irregulars. Which won't be for sometime yet by the look of things.

So I'll let you check them out and hopefully you can leave your opinion.

VIEW FROM NORTH TO SOUTH.

I do have a couple more questions. How many PEF markers do I need?

ISOMETRIC FROM NORTH WEST CORNER.

How many zombie spawn markers do I need?

ISOMETRIC FROM SOUTH WEST CORNER.

Not too many vehicles at the moment, I've printed out 8 more. They're stuck to card and have been cut out, just need scoring and gluing.

A CLOSE UP OF SOME SHIPPING CONTAINERS.

This card modelling is not as easy as some people make it look! Cough, BRYAN, cough.

CLOSE UP OF WAREHOUSE ENTRANCE.

The ground tiles came courtesy of Sheldon, what a Dude! The darker one is from a DUST tactics set, whilst the lighter one came with his Deadzone stuff.

THE COPS MUST BE DRY CLEANING THEIR UNIFORMS. I GUESS BLOOD IS A STUBBORN STAIN.

So these last couple of weekends I have been really busy watching sport. Weekend before last there was a little thing called the Superbowl, some of you may have heard of it. That same weekend saw the Six Nations rugby championship kick off, well I am Welsh!

VIEW FROM THE WESTSIDE.

This weekend saw a continuation of the Six Nations, so that kind of put paid to that. Got to cheer the boys on, see.

VIEW FOM THE EASTSIDE.
Don't forget The Walking Dead is back from it's mid-season break tonight, woo hoo!

Well I guess that's all I've got for this time dudes and dudettes. So until next time y'all keep walking the right path, following the DUDE'S footsteps and "take her easy".


Wednesday, 30 September 2015

A LITTLE MORE CARD MODELLING.

What's occurrin' then?

I mentioned last post that the Rugby World Cup might have an impact on my hobby time. Well, it has but I wanted to at least get another post in this month. To this end I've managed to complete a little card modelling, mostly done at half times and between games.

Even though there's a major distraction, we can't let that derail the cultural mission. This time I present you with another masterpiece by Bryan Baugh. Not many more examples of his work left to show now. This fine example is called Drippy Zombie. Enjoy!

DRIPPY ZOMBIE!

Like I said just a little card modelling completed around some of the fantastic games this Rugby World Cup has provided. It's mostly boxes for set dressing and interior detailing. All the boxes came from Model Paper World, they are designed by the infamous TommyGun and are free to download. The car and dumpster can be found at the Combat Storm website, again these are free downloads.

LOTS OF BOXES!

I'm trying to use as many free downloads as I can find to cover my playing area, the two sites mentioned above have some great stuff available and have given me a good start in this venture. Some of the smaller stuff can be really fiddly especially when you've got great big shovels for hands and massive sausage fingers like me. To this end I found those little elastic bands, the ones all the kids were playing with (loom bands), invaluable for holding these together whilst the glue dried.

I was shooting for a Sunday post last weekend but a certain fantastic win at Twickenham and the following celebrations put paid to that. I'd just like to wish the boys all the best for the game against Fiji tomorrow.

The beginning of October tomorrow, the official start of Zombtober. This is going to be only my second one, but last year was pretty cool and it was great to see everyone's work and connect with some like minded bloggers. It's growing into quite a "thing".

So I'd better get the cobwebs off my brushes and my thumb outta my ass, it's painting time. Hopefully Zombtober will provide the impetus to get my pitiful painting progress back on track. I'm really looking forward to seeing everbody's work.

Well, that's all I got for this time dudes and dudettes. So until next time try and take a leaf out of the DUDE'S book and "take it easy".


Thursday, 30 July 2015

THE SAGA OF THE SHED CONTINUES AND VISITORS TO THE BUNKER.

What's occurrin' then?

Well to be fair, not that much hobbywise. Last week seemed to fly by in a succession of visits/reunions. Firstly at our weekly WNI (Wednesday Night Irregulars) session, we had a visit from an old team mate and prolific gamer. Let's call him The Baron (named changed to protect the innocent). The Baron  and I, along with Sheldon and Morph all played American Football together, it was for a proper team and everything. It was also a long time ago and I hadn't really seen The Baron since. On Thursday another surprise visitor, Northern Lighter Thief (Again name changed to protect the innocent). NLT from now on. Hadn't seen NLT since the heady days of Morph's Garage and 40K. Several years ago now. Still a tremendous amount of fun was had.

Before we get distracted by all the rose coloured nostalgia, let's get back to the business at hand. That business being the promotion and appreciation of zombie art and artists. Yes, the cultural mission. So again another really nice piece from the extraordinarely talented Bryan Baugh! I know that some of my viewers particularly like his damsels in distress. This one is called Half and Half Horror. Enjoy!


Anyway, The Baron came along to play Zombicide and he brought beer and snacks. Along with the zombie slaying, we managed a few beers and talked about our long gone glory days. Great fun was had by all, except Morph, who had to be home in bed by ten. Lightweight!
So The Baron agreed to join our ragtag band of survivors and become an irregular attendee at WNI. Result!

Thursday, as mentioned a visit from NLT. Upon mentioning gaming the previous night and large amount of fun involved, NLT quickly said that he would call in on a Wednesday in future. Wow, another or should I say returning irregular. I'm not holding my breath on this one though, NLT has been known to be unreliable more often than not. Plus he didn't say which Wednesday.

Friday didn't get any quieter. Just sitting down to dinner, phone call from The Tollman. It was time to pay my toll, he needed a lift to Barry (Home of the comedy Gavin and Stacey) to pick up his new transport. So a few hours on a mission of mercy. Just think of all the karma points man.

In spite of all the merriment taking place at the bunker, I 've managed to progress a little more with the shed. The making of which is turning into a saga all of it's own.

And there I arrive at a problem. Photo's need taking but my official photographer is away visiting a friend. She doesn't get home till the early hours of Tuesday morning. So no photo's on time or photo's and a couple of days late.

So obviously waited until my official photographer had enough "princess" time, before she could take them. Anyway they are done now.

So let the saga continue. Firstly we have a shot of the front. For some strange notion I thought that painting the door seperately was a good idea. It's not.

FRONTAGE AFTER DRYBRUSHING.

I was totally wrong last time, it was basecoated with Chocolate Suede, not Cozy Cocoon. I followed  the basecoat with a heavy brybrush of Cozy Cocoon.Then a lighter drybrush of Oatmeal (Wilko tester pot 75p.). I made up a wash from various dark colours and inks, then heavily diluted, I slapped it all over the building. Inside and out.

LEFT SIDE. VERY BORING.

Maybe some posters will brighten up the big flat surfaces. Or some blood.

RIGHT SIDE. EQUALLY BORING BUT A COMPLETELY DIFFERENT COLOUR IT SEEMS.

 I quite like the irregular staining from the wash, makes it more natural I feel.

A SLIGHTLY MORE INTERESTING BACK VIEW.

The interior was washed with the same mixture. Bringing out some detail and leaving behind some more irregular staining.

INTERIOR SHOT. BACK WALL.

A little blood splash to match similar patterns on the floorboards. More wash.

CLOSE UP OF THE BACK CORNER.

Remember the drag marks, well now they end somewhere, or is it start somewhere.

INTERIOR IN SITU WITH FLOORBOARDS.

Still needs the doors painting and window mesh coloured. Gluing to the base, basing, it goes on. It seems the shed saga will continue for a little while longer.

FRONT ELEVATION.

Bugger, just realised I haven't done the bloody roof yet.

Well, it seems like that's all I got this time dudes and dudettes. So until next time, follow the DUDE'S example and "take it easy".